Praxe tvarování ostří
Praxe tvarování ostří (Peter Vido)
(Přejalo z Kosa musí tančit od Petera Vida, publikovaném v r. 2001 jako dodatek ke Knize o kose [ The Scythe Book ] od Davida Tresemera.)
Wendell Berry ve svém podnětném eseji Dobrá kosa jednoduše prohlašuje, že naučit se (jak naklepat kosu) vyžaduje určité úsilí a rozvahu." Měl na mysli tradiční "ruční" metodu, kterou David Tresemer probírá stručně v Knize o kose. Zásady broušení představují můj pokus o úvahu; ona teorie je použitelná při klepání ostří kos obecně. V praxi vyžaduje ruční metoda trpělivost a dobrou "trefu" kladívkem.
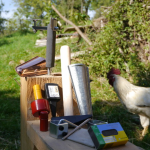
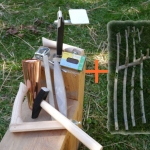
Ku prospěchu těch, kteří jsou buď příliš uspěchaní nebo nemají dobrého učitele, vynalezli naštěstí někteří kutilové před desítkami let různé formy pomůcek, které proces usnadňují a rozvahu zjednodušují.V angličtině se jim říkalo třeba klepač na kosu, pomůcka k broušení kosy nebo "naklepávací zařízení". Já tomu říkám naklepávací vodící pomůcka nebo prostě naklepávač.
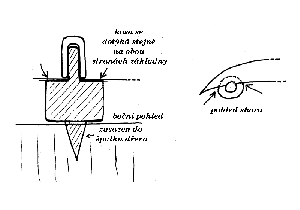
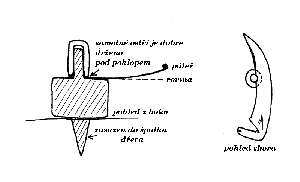
Jeden ze dvou modelů, které jsou nyní k dostání v Severní Americe, je zobrazen na kresbě č. 1. (Klikni na diagram pro zobrazení většího obrázku.)
Kresba č.1
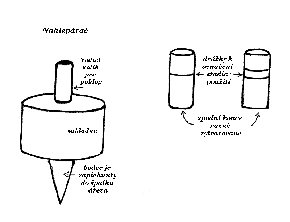
Zda pan Tresemer nevěděl o jeho existenci, nebo zda si myslel, že by to nebylo užitečné pro jeho internetové zákazníky, já nikdy vědět nebudu. Snad byl výjimečně nadaný nebo rychlý při práci s kladívkem. Anebo si možná myslel, že když bude používat co nejjednodušší nástroje, šance pro zachování jedné staré dovednosti se zvětší. Pokud si myslel to druhé, nostalgická část mé duše mu fandí, jelikož já osobně se přikláním k užívání těch primitivnějších z dostupných metod. Viděl jsem už ale dost zničených kos, "dotenka ručně naklepaných", abych nepovažoval tento naklepávač za téměř nepostradatelnou pomůcku pro každého začátečníka.
Primární výhodou naklepávače je to, že nahrazuje nepřesně mířené rány kladívem. Efektivně s ním zkosíte předem určenou šířku ostří, aniž byste riskovali přesah, takže výsledek bude mnohem konsistentnější.
V mnoha zemích Evropy je obvyklé klepat kosu připojenou ke kosišti. Vynalezli tam různé způsoby přidržení celé sestavy. Nebudu je zde popisovat, protože jsem přesvědčený, že s dnešním existujícím průměrným vybavením, lze dosáhnout přesnějších výsledků, jestliže je kosa oddělena (odšroubována) od kosiště. To vyžaduje jen pár vteřin a navíc umožní znovu správně nastavit úhel mezi kosou a kosištěm, vyčistit a příležitostně namazat část kosiště, v níž se hromadí úlomky a vlhkost, a naolejovat závity šroubků na kroužku.
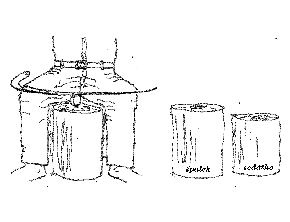
Jedním z předpokladů je postavit stabilní špalek dřeva, nejlépe o průměru alespoň 30 cm, na němž se dá pohodlně sedět a kde máte k práci světlo. (Naklepávač může být upevněn ve svěráku, což vlastně uvádějí v návodu. Já to považuju za špatnou náhražku, protože málo uživatelů, kteří to dělají tímto způsobem, by si dalo tu práci a udělalo si pomocnou sestavu k podepření jednoho konce kosy, zatímco by na opačném pracovali.) S krátkou kosou by to nebylo tak obtížné;, ale při pokusu udržet ve stabilitě kosu o délce 70 cm a více by při naklepávání její špičky určitě byla nějaká podpora určitě víc než vhodná. Můj oblíbený způsob uchycení kosy je zobrazen na obr. 2 ---protože stehna mohou umožnit okamžité přizpůsobení se jakékoliv metodě, kterou jsem vyzkoušel.
Obr.2. Tento špalek dřeva je 50 cm vysoký a sedátko o 10-15 cm níže (na obr. to není zakresleno přesně). Míry by měly být přizpůsobeny tak, aby se uživatel cítil pohodlně.
Doporučuje se do špalku dřeva vyvrtat o něco menší dírku před tím, než do něho zasadíme naklepávač. Jakmile je poklop na místě, opatrně ho zatlučte kladívkem, až bude relativně pevně držet; v tomto okamžiku můžete vložit kosu a začít pracovat. Zanedlouho se bude základna naklepávače dotýkat dřevěného bloku. Anebo můžete zatlouci naklepávač kusem tvrdšího dřeva, aniž by byl poklop na místě. Střední kolík na němž se točí, by neměl být nikdy zatloukán ocelovým kladívkem pokud nejsou poklopy na místě, poněvadž by se to mohlo tak zničit, že by to znemožnilo hladký pohyb poklopu. Je také lepší udeřit na poklop pořádně bez vložené kosy; uchová si to tvar svého dolního konce mnohem déle, pokud se nebude tlouci přímo na samotný základ. (Během kurzů/ukázek na pouti jsem viděl děti vesele tlouci "naprázdno" naklepávač jen pro zábavu.) Kosa se chová jako by byla podložkou.
Oba poklopy jsou postupně použity a mají různě tvarované spodní konce. První dosáhne zhruba 4mm od okraje ostří. Druhý stlačuje kov blíže k hraně ostří a tím ho trochu vytlačuje ven. Pokud se o kosu příliš nedbalo - nemusí jít přímo o zničení, ale třeba pokud byla používána příliš dlouho bez naklepání -bude nejspíš nutné zopakovat krok s jedním nebo s oběma poklopy. Pokud se tak bude dít v pravidelných intervalech po zhruba čtyřech hodinách kosení, neměli byste pokaždé potřebovat k použití ten první poklop.
Před tím, než s klepáním postoupíte, je tu ještě jeden důležitý a často opomíjený krok. Jde o čištění ostří, alespoň v rámci zóny klepání, která činí asi 2-4 mm. Použijte smirkový papír na kov, " kus" gumy se zapuštěným brusným práškem nebo jiný druh vypolštářovaného brusiva. Očištěte ostří, až se bude lesknout, a poté zkontrolujte kazy, které by se měly opravit před zahájením klepání. K tomuto tématu odkazuji na svůj text The Scythe Must Dance, str. 156-161 nebo k úseku o "opravování poškozeného ostří" na této stránce,... kde se brzo objeví.
Prohlášení v reklamě možná souvisí s myšlením budoucího kupujícího, a sice že "tento profesionální brousící broustředek" vám vytvoří "pokaždé perfektní ostří". Vzhledem k metodě ručního naklepání je používání naklepávače snadné, a přesto není úspěšnost automaticky zaručená. Abyste zajistili stejnost, sledujte toto:
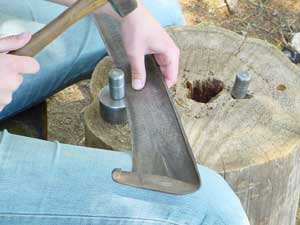
- Kosa se dotýká obou konců základny během klepání. (Obr. 3)
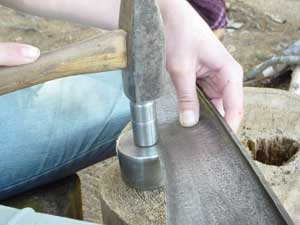
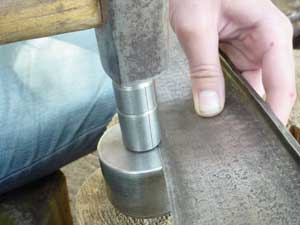
- Samotné ostří kosy je dobře podepřeno, když je s ním poklop ve styku. (Celkové zakroucení mnoha modelů kos vyžaduje, aby byly lehce nakloněny, aby se toho dosáhlo.) (Obr. 4)
- Četnost úderů kladivem je v synchronickém vztahu s rychlostí, s jakou posunujete kosu, a použitá síla je po celou dobu téměř stejná.
K používání naklepávače není potřeba žádné speciální kladívko. Jakékoliv běžné kladívko, které váží alespoň 500-600 g bude stačit. Pro případ zanedbaných kos nebo kos na křoviny bude účinnější těžší kladívko. Myslím, že je lepší použít těžší kladivo citlivě než lehké kladivo příliš agresivně. V opatrných rukách bude dobré i kladivo o 1000 gramech. Příliš tvrdými údery se to s klepáním ale může přehnat. Mohou vzniknout praskliny nebo může dojít ke "zvlnění" ostří, jako by to byl kus krepového papíru, zvláště když primární zkosení je relativně tenké (což je případ většiny nových rakouských kos). Věřím, že klepání by časěji přinášelo lepší výsledky, pokud by se člověk soustředil na zploštění "zadního zkosení" místo na ztenčování ostří. (Zadní zkosení, jak už je vysvětleno v Zásadách broušení je v "zaoblenosti okraje" způsobeném kontaktem brousku s ostřím při stále se měnícím či nekonsistentním úhlu.
Pro vůbec první naklepání možná budete chtít jen jednou přejet kosu, spíš než se vcítit do upevnění, do rytmu a do toho, jak ocel reaguje. Poté opatrně zkontrolujte, kde zůstalo zadní zkosení; zkuste si tyto oblasti označit svrchu pomocí křídy a pak je znovu jemněji klepejte.
Jestliže byla práce dobře udělána, po tomto procesu by ostří kosy mělo být správně zkoseno, ale vlastně ne ostré. To protože běží proti středovému válečku či tyči naklepávače během klepání, což ho samozřejmě otupuje. Prohlédněte si ostří a všimněte si světla, které se od ostří odráží. Pohněte s ním mírně do stran a dopředu, až najdete úhel, kde je odraz světla největší; nikdy by se světlo takto nemělo během užívání kosy odrážet více než v této fázi. Každý nástroj s ostřím se považuje za příliš tupý pro různé účely použití, pokud oči průměrného člověka objeví tento odraz, když je ostří přidrženo proti dobrému světlu. Nyní bude zřejmé, že není třeba použít víc tlaku na kosu proti válečku naklepávače, než je nutno během klepání.
Více práce bude nyní potřeba s brouskem k přípravě kosy k sečení než při přestávce na přejetí kosy brouskem na poli. Syntetický kámen vykoná první část úkolu mnohem rychleji. (Ve skutečnosti přírodní kámen s jemnou brusností může být tak pomalý, že než je ostří skutečně břitké, objeví se na zkosení určité "zakulacení". Pokud máte jenom přírodní brousek, učiňte tento krok se stolním brouskem z karborundumu, nebo se smirkovým plátnem o drsnosti 120, které bylo stlačeno do kostky dřeva.) Doporučuji, aby se tak učinilo v určité pohodlné a pevné pozici před nasazením kosy na kosiště. Já obtahuji nejprve svrchu držíce levou rukou kosu za patku, špičkou proti kusu dřeva, diagonálně přede mnou zatímco klečím na zemi; jestli chcete, zkuste jinou polohu.
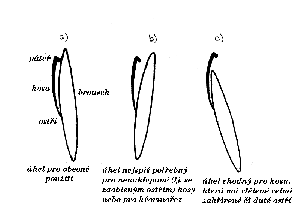
Pro objíždění kosy brouskem svrchu, když je odpojena od kosiště, používejte uzší stranu brousku (Obr. 5). Většina brousků má tvar, který odpovídá tak trochu zakřivení mezi mírně pozvednutým ostřím a zadním hřbetem kosy. Pokud je použitý na jejich vypouklou stranu, je možné docílit nižší úhel zkosení, pokud si to přejete. Jak bylo vysvětleno, když tak učiníme, získáme pronikavější profil, ale také zvýšíme zranitelnost. Opravdové kosy na křoví, jsou například lepší s méně přesným sekundárním zkosením a měly by být přejety brouskem pod ostřejším úhlem než ve vztahu mezi hřbetem a ostřím (Obr. 7).
Pokud je hřbet použit jako vodítko úhlu, pak by se měl kámen hřbetu sotva dotýkat a tlak by se měl soustředit na ostří. Nedochází k žádné přímé škodě, pokud třete jak hřbet, tak ostří stejnou silou, pokud to pro Vás bude zpočátku snazší než jen zbytečně vléčení o kámen.
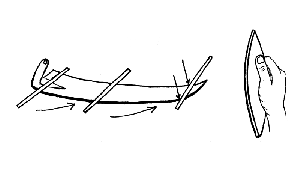
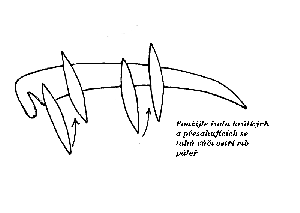
Já přejíždím kosu pouze jedním směrem pryč od sebe, od paty kosy ke špičce a po diagonále, jelikož mi to umožňuje delší záběr. Kolik tahů zabere tato část úkolu, bude také záviset na kameni, který používáte, jak moc tlačíte a na jak moc bylo na ostří tlačeno proti válečku naklepávače během klepání. Pokračujte, dokud neucítíte jemný "otřepek", který vznikl na opačné straně. Pokud jsou nástroje, s nimiž se brousí, pro vás novinkou, je třeba, abyste ho nahmatali s obezřetností. Pomůže, když kosu otřete nebo omyjete vodou. Jakmile se i ten nejmenší "otřepek" kdekoliv objeví, ono místo již nechte být a pokračujte v obtahování brouskem zbytku. Když je již cítit po celé délce, obraťte kosu vzhůru nohama a odstraňte otřepek. (Obr. 6)
Obr. 6
Opakujte tyto kroky s přírodním brouskem.
Poznámka o brusivech: Kvalita brousků přírodních versus syntetických
Hladce řezajících ostří je docíleno díky používání brusných materiálů poněkud jemnějšího charakteru. Většina dnes dostupných brousků nenáleží do této kategorie.
Všechny brousky (brusné kameny) fungují tak, že vyřezávají drážky v ocelovém ostří. Čím větší, tvrdší anebo ostrohrannější jsou brusné částice (tj. zrna), tím větší drážky budou. Nevyhnutelným vedlejším účinkem tohoto procesu je to, že některé části "částečně odřezané" oceli zůstávají přichyceny a vyčnívají podél ostří. To vytváří tak zvaný "otřepek". Většina bude přehnuta přes ostří pryč od směru, kterým se brousek pohybuje. Když použijeme kámen na opačné straně, část otřepku se přehne zase zpátky. Tato hra by mohla pokračovat "donekonečna", poněvadž i když se část otřepků odlomí, více je vytvořeno zrnem brusiva. (Čím hrubší je kámen, tím více tomu tak je.) Když bude někdo, kdo nemá velkou zkušenost s broušením, zkoušet ostří, možná ucítí jednotlivé zoubky obsahující otřepek, jak zachytává o kůži jeho palce, a nástroj se bude klamavě zdát být "ostrým". Ve skutečnosti by tyto zoubky měly být považovány za svízel nebo v nejlepším za přechodný stav v určité fázi celého procesu broušení.
Účelem konečného obtahování brouskem tedy vždy bylo odstranění otřepku co nejúplněji. Oblíbený názor, že zoubkování podél ostří je žádoucí, je zpola mýtus. Cílem tvorby zoubkovaného ostří na některých řezných nástrojích během procesu výroby je snížit četnost, s jakou je potřeba brousit.
Zoubkovaný nůž možná skutečně funguje velmi dobře, když je nový, a stále bude řezat několik let později, aniž by byl nabroušen. Je ale třeba rozlišovat. Jeho relativně odolné zuby jsou výsledkem umyslně specificky tvarovaného ostří výrobcem a jsou navrženy, aby vydržely celý život nástroje. Typ zubů, o které se nám jedná při diskuzi o kosách, jsou ty, které mají krátké trvání. V nejlepším se některé z těch nejmenších a nejlépe vyrovnaných postupně odřou. Nejčastěji se asi jedno procento z nich ohne a odlomí během prvních pár sekund používání, a zanechají po sobě plochýa světlo odrážející povrch, jinými slovy - tupé ostří v onom bodě. Čím hrubší je používaný brousek, tím širší bude tupý povrch a méně břitké ostří. Není pochyb o tom, že ostří, které bylo dobře dobroušeno s jemnějšími brousky, sečou snadněji a hladčeji; malý a méně vyčnívající otřepek se nebude ohýbat a neulomí se tak brzo.
Jak bylo vysvětleno v Zásadách broušení , brousek začíná měnit "ideální" pronikající profil ostří od prvního obtažení. Proměnné, které ovlivňují časový interval, v němž je znovutvarování ostří výhodné, mají proto většinou vztah k tomu, jak je ostří obtaženo.
Téměž vždy používám jemnozrnné přírodní brousky a obtahuji jimi zhruba každých pět minut. Při sečení v terénu, kde jsou kameny jen vzácně, naklepávám kosu v průměru každou 3. až 4. hodinu. Pokud bych používal ten druh syntetických brousků, které dnes převládají, časový interval bych snížil na polovinu.
V tradicích mnoha evropských zemí to činí 4 až 6 hodin - což je" denní možnost kosení".(tedy klepat po jednom dni kosení, pozn. překl.). Během "přestávky na oběd" (kolem 7 až 8 hodin ráno) se kladivo kos většinou nedotklo. Pouze ti, kteří měli kosení jako sezónní práci, zůstávali na poli v odpoledních hodinách, když už bylo sucho a sečení obtížné. Ti, kteří si mohli dovolit vlastnit dvě kosy, si kosu v polovině dne vyměnili; obě byly připraveny ke kosení předchozí večer.
Z tohoto pohledu výše uvedeného a z mé vlastní zkušenosti jsou 15minutové intervaly pro obtahování brouskem a 12hodinové pro klepání, které doporučuje David Tresemer ( v knize The Scythe Book, pozn. překl.) příliš dlouhé. I kdybych byl silný člověk, považoval bych to za zbytečné mrhání energie, aby kosa konečně začala sekat trávu, když je udržována podle takového časového rozvrhu. Možná jsem líný, nebo pouze rád obtahuju a klepu kosy...sečení je velmi osobní zážitek. Čas, který zabere naklepání kosy, mě netrápí. Kvalita výsledku má přímý vztah k trpělivosti a k pozornosti k detailům.
S naklepávačem můžete být hotovi asi za 10 až 5 minut na jeden poklop s určitou zkušeností i za poloviční čas. Já dávám přednost ručnímu klepání a i po své zkušenosti s klepáním bezpočtu kos mi to stále trvá asi 15 až 20 minut na jednu průměrně dlouhou kosu. Takto si užívám chvíl plných soustředění v letních dnech.
Je také podstatný rozdíl mezi klepáním kosy, která byla zanedbána, tj. byla dlouho nenaklepána, a pouhým "dotknutím se" té, která byla dobře udržována. Tresemerův diagram (str. 22 v The Scythe Book) navrhuje to, čemu já říkám metoda klepání o čtyřech linkách, což je víceméně "celá" práce. Já bych tohle nikdy začátečníkům neradil. Jedna či dvě linie opakované v častějších intervalech by určitě vytvořily mnohem uspokojivější výsledky.
Jinými slovy - jestli někdo chce strávit pouze pět minut klepáním 70cm kosy, měl by dělat jednu linku trošku přesahujících úderů. Já sám to příležitostně tak dělám - a ano, mohu to zvládnout za pět minut.
Dokud nebudou publikovány obšírnější poznatky, dám vám jeden návrh: praktikujte klepání na použitých "amerických" kosách. Často se dají sehnat za několik dolarů a mohou zachránit vaši dobrou kosu od prvotního poškození. Ještě jsem nenatrefil na takovou, která by se nedala naklepat; ve skutečnosti mohou některé fungovat lépe než mnoho kos z nedávné produkce. Nezkušená osoba ji může nalomit (což samo o sobě je dobrá lekce a příležitost k opravě ostří), ale ne proto, že kosa by byla příliš tvrdá. Spíš najdete kosy s ostřím příliš tlustým a vypouklým na obou stranách a možná praskne nebo se ulomí, pokud se na ostří udeří, aniž by bylo dobře podloženo. Pomůže, když budete zkosení pilovat, aby bylo tenčí a plošší.
A vždy, pro Boha svatého, odstraňte VŠECHNU rez na obou stranách ostří, které se chystáte klepat.
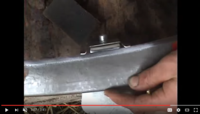
Několik fotografií zaměřených na klepání ostří; klikněte na každou z nich pro větší formát.
Špatná technika - ostří není dobře podepřeno. (ostří "neleží" dobře na naklepávači, pozn. překl.)
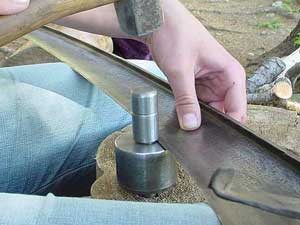
Jiný pohled na totéž.
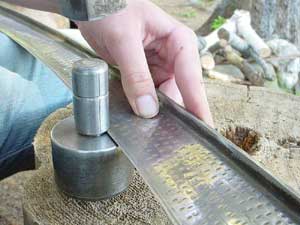
Dobrá technika (další tři fota).
